Tying an ep bulkhead
This is a fly I just recently came up with and it will work well during spring and summer time when minnows are schooling. This fly is best fished with long strips followed by a couple of fast strips and a pause. This will make the zonker strip tail flow to imitate a minnow’s tail. The head of this fly is tied with a technique I learned from McFlyangler and fly fish food. It is achieved by flattening stacks of ep fibers between your fingers and then spreading them around the hook evenly.

Thread
Rabbit zonker strip
Ep fibers
Sharpies or other markers(optional)
Glue on 3d eyes

Step 2: measure out your rabbit zonker to fit your hook length and then tie it in directly on top of the hook. Once you’ve done this you can cut your tag on the zonker strip to stop right before the spot you marked to start the head of the fly
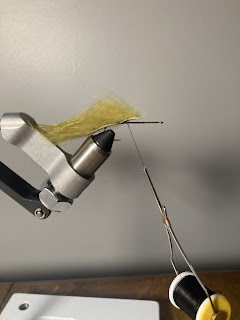
Step 1: start your thread a little ways back on your hook to mark a point to start your ep fiber head and then bring your thread to the bend of the hook
Step 3: flip your fly over an v tie in a stack of tapered ep fiber. This is a technique that involves tying in the stack at its mid point on your side of the hook then pulling the other end to the opposite end of the hook shank. This stack should be very sparse as the next stack will be more dense. The stack should measure to about the mid point of your zonker strip tail


Step 5: fold all of the fiber sticking out toward the front of the hook back and bullet tie this stack. After this repeat the process but instead of bullet tying it make a thread dam to hold the fibers rearward until you get to the hook eye. Try and get as many of these stacks on the hook as possible to get a dense head on the fly


Step 7: add color and trim the fly more until it is perfectly round and it bleeds into the body. This might take some time and practice but eventually you will get it. The coloring is optional but I highly reccomend it to help the fly look more realistic and so there is no immediate color change throughout the fly

Step 8: add eyes onto the front of the fly with super glue or other adhesives like taremender. Make sure there is more of the eyes on top of the hook shank to help it ride straight in the water. Also make sure that you glue the eyes on in line with each other so that the fly will fish straight

This fly can be tied in various color combos to imitate different minnow species and tied in larger sizes. It works very well during spring time when fish are spawning and during summer when minnows and baitfish are schooling
If you liked this post please consider checking out our other posts
Comments
Post a Comment