Tying a diver fly for bass
This is a pattern I came up with at the beginning of winter and it’s based off of Andreas Anderson’s deer hair fly patterns. This fly dives when you strip it with a sinking line and slowly returns to the surface. The intent for this fly was to create a versatile bass fly for spring time. Flies like this work best when it is clear and the bass are spawning. When stripped down into a bass bed it is sure to draw a reaction strike
Materials needed:
26 degree bent hook
Normal thread
GSP thread for the deer hair(optional but recommended)
Bucktail
Flash
Deer hair
Flat edge razor blade
Mylar tubing
Step 1: if you don’t have a bent streamer hook, you can bend it yourself. This is the best time to do that if so. Start your thread behind the start of the bent section on the hook to mark where to end your body stacks

Step 2: tie in a small price of Mylar tubing to help flair the bucktail. Make sure you keep this stack short so it’s not as visible through the bucktail. Then tie in a sparse stack right in front of the Mylar

Step 3: tie in 2 strands of flashabou to veil the back of the tail. If you aren’t using large flashabou like I am you can use more to fill the space but don’t use to much

Step 4: move your thread up a little bit and repeat step 2 but use more mylar and more bucktail. Make sure to leave room for more bucktail stacks so don’t move to far up the hook from the last stack(I ended up adding 2 more stacks but your hook size may be different from mine)


Step 7: add your GSP thread if your using it. Ignore this step of your using the same thread as you used for the body

Step 8: tie in a deer hair collar by spinning it around the hook(a link will be added to the bottom of this post to a tutorial to how to do this) Make sure to leave the but ends of the deer hair sticking out to add more deer hair to the head which will create a cleaner fly with better action. For the next few steps make sure you turn your hook up in the vice to prevent your thread from slipping down the hook. After each stack of deer hair pack it back into the last stack to make sure you get the most deer hair as possible on the hook. Also make sure your using as much deer hair as you can handle in your hand. This might seem like to much at first but the more deer hair you can handle the better results you will have once you trim it

Step 9: continue to add stacks of deer hair and make sure to trim the tips of of the rest of the stacks so that you can tell where your collar is and where to stop trimming later. Remember to pack the deer hair back after each step to make it as tight as possible

Step 10: this step is the same as the last step but you may end up with just a small bit of room behind the hook eye. A rule I always follow when tying with deer hair is that if you can still see hook shank you need to add more deer hair. This will be hard to do at first with the hook eye right there but you’ll get used to it after some practice. This is another reason why you want to pack your hair back before the next stack because it creates a little bit more room for your last stack. Once you have it tied in you will need to pack it back and then pull all of the hair back and try to wiggle your thread through to the hook eye. Sometimes if you use to much deer hair with too little room you might not be able to find the hook eye. In this case I use a truck where I add some super glue to my thread and wrap through the deer hair until all of the glue is inside the fly then you can skip the whip finish. If you can though it is best to try and whip finish once you get to the hook eye

Step 11: whether you whip finished or used the super glue trick you will cut your thread and don’t worry if you still can’t see your hook eye. In this situation I just move on to trimming the fly because in the end I use another cool trick to clear the hook eye that many of you will probably already know if your an experienced fly tier. Once your finished trimming the fly you’ll want to slide your bodkin up through the eye then take a lighter and heat it up and draw it back through the eye. This will clear it and leave room for tippet. For this step trim the bottom of the head flat and as tight to the hook shank as possible without cutting your thread underneath the hair. Make sure to not cut into your collar


Step 13: turn the fly on its side and trim the sides with scissors. Don’t cut the corners because you’ll want the fly to have a rectangular shaped head that will cause the fly to have its diving action. Trim the sides mostly flat but add a super small curve that will mark the fly slightly wider but still keep the shape. This way it will push the most water as possible and dive deeper
Yeah 
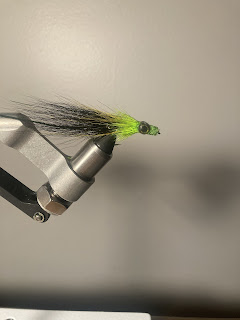
Step 14: add your final small detailed cuts to make the fly even on both the sides. After this go over the head with super glue or it resin to make the head push water instead of shed it which will also help the diverting action. If you got a really tightly packed head this step isn’t really important but I still do it because it also adds a solid bad to glue eyes onto. Once the head dries add drops of glue onto the sides of the head and push on eyes that fit the size fly you tied. The fly is now complete and ready to fish
Step 14: add your final small detailed cuts to make the fly even on both the sides. After this go over the head with super glue or it resin to make the head push water instead of shed it which will also help the diverting action. If you got a really tightly packed head this step isn’t really important but I still do it because it also adds a solid bad to glue eyes onto. Once the head dries add drops of glue onto the sides of the head and push on eyes that fit the size fly you tied. The fly is now complete and ready to fish

This fly is best fished with short steady strips followed by a hard strip to dive the fly. You will want to fish this fly on a sinking line to get the best results out of it. A good technique to use during spring for bass is to use a hard strip to dive it into a bass bed which will draw a solid reaction strike almost every time.
Here is a link to a video that will teach you how to spin deer hair if you don’t already know how.
If you liked this post please consider checking out our other posts


Comments
Post a Comment